Cloning & Assembly Plans
by Alexis Casas, Jacob Beal, Ian Schlander and Peter Carr,
on behalf of the Measurement Committee
Alexis, Jacob, Ian, and Peter also gave a session on this topic at iGEM’s 2020 Opening Weekend Festival (YouTube)(Bilibili)
There are a lot of new things happening this year, and the iGEM Measurement Committee is happy to help you learn about the concepts, tools, and resources that are available to iGEM teams. In this post, we address three questions:
What is cloning and gene assembly?
Why is cloning and gene assembly important?
How is cloning and gene assembly done?
Briefly, the answers to these questions are: Cloning and gene assembly is the process of stitching different pieces of DNA together to construct your genetic circuit and integrating it into a living organism. It is important because it is the basis of your design and engineering processes, and it is accomplished through various molecular biology techniques with the help of organism’s natural molecular machinery.
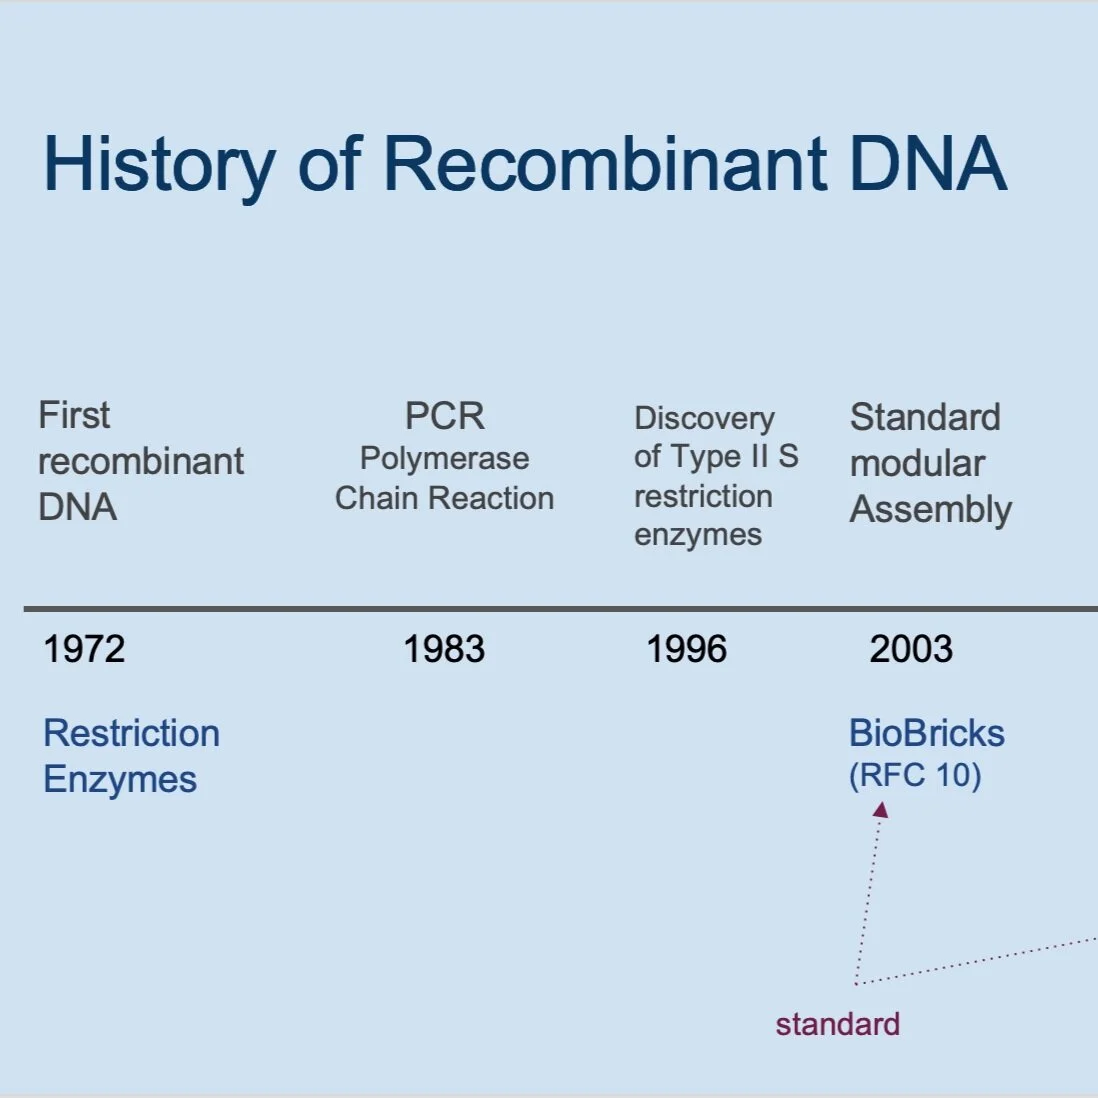
But before delving into these questions in detail, let’s take a look at the historical context of cloning and gene assembly.

Recombinant DNA technology was discovered in 1972, when Herbert Boyer from the University of California San Francisco and Stanley Cohen from Stanford observed an enzyme that could cut DNA in such a way that would make the different pieces of DNA overlap. They discovered enzymes to cut DNA at specific sites, and they fused the different pieces of DNA back together. At around the same time, they found a process to put the DNA back into bacteria and observed that the bacteria would create clones of the DNA.
The polymerase chain reaction (PCR) was developed in 1983 by Kary Mullis, who was working at Cetus Corporation at the time. PCR is a way of taking very small amounts of DNA (sometimes only one molecule of DNA) and making many copies so you have plenty of DNA to work with.
The use of standards for modular assembly of DNA parts began in 2003 with the introduction of the BioBricks assembly method (RFC 10) developed by Tom Knight. RFC 10 became the standard for the iGEM Registry of Standard Biological Parts that enables teams to share and re-use the “parts” they created. Another standard – the Type IIs restriction enzyme cloning method (RFC 1000) – was adopted by iGEM in 2011 to enable teams to assemble multiple parts easily and reliably in a single reaction.
Tip!
Check out the iGEM Registry of Standard Biological Parts. When you submit a part to the Registry, it is expected and mandated that the part be in one of the two standard formats – RFC 10 or RFC 1000 – unless you have been given an exception.
Design-Build-Test
In synthetic biology, we engineer within the Design-Build-Test cycle. The Design and Build phases include cloning and gene assembly. Testing is the measurement and analysis of the designs you build. To measure well, you must design and build well.
Typically, you will go through the Design-Build-Test cycle several times. Each time you will improve something about the design and build, continuing to iterate until you have reached a goal. Your goal may be to prove that your system is working, or to produce a certain quantity of a molecule, or to measure a signal or output to detect something, etc.
Design is the first phase of the engineering process. This is where you lay out your ideas and imagine how to implement them. In the design phase, some good modeling can help you predict, or at least point you in the right direction of the potential outcome of your system in order to prepare for experimentation in the lab. Design goes beyond just the design of DNA sequences, and occurs at many different levels:
– Experimental design
– Plasmid design
– System & process design
– Synthetic pathway design
– Enzyme/Protein design
For more information and resources on design and modeling, check out the sessions on Software Tools for Genetic Design (YouTube)(Bilibili), Developing Synthetic Biology Designs using ShortBOL (YouTube)(Bilibili), and Modeling for Synthetic Biology (YouTube)(Bilibili).
Build is the second phase of the engineering process. Good building starts with good design and planning, at this point you shift from ideas and designs to actually constructing the device in the lab. Important features of building include cloning processes (DNA assembly, Transformation, Growth/Antibiotic selection), DNA assembly methods (BioBrick standard, Gibson assembly, Type IIS assembly), and Troubleshooting (using controls and validation of construction steps).
Cloning Workflow
Building is basically cloning, which is the process of isolating, recombining, then assimilating the DNA inside the genome of your host organism. A typical cloning workflow is:
1. Isolate bacterial DNA (natural DNA) or order DNA (synthetic DNA)
2. Use enzymes to cut fragments of DNA
3. Use enzymes to recombine the DNA fragments
4. Insert the recombinant DNA into bacteria

STEP 1: Isolate or synthesize DNA
The DNA can be natural (i.e. DNA from an organism), or it can be synthetic, or it can be a combination of both. What is important to remember is that regardless of whether the DNA is natural or synthetic, it is exactly the same molecule with the same properties and works in the same ways. If you choose to isolate natural DNA from an organism, you will isolate DNA in the form of a plasmid using methods such as using a miniprep kit to purify the plasmid DNA. If instead you choose to have the DNA synthesized, you will begin by designing the DNA on your computer (in silico design) and then place an order with a DNA synthesis company who will then synthesize the DNA and ship it to your lab.
STEP 2: Use enzymes to cut fragments of DNA
You can cut out fragments of DNA with the help of restriction enzymes. There are many types of restriction enzymes and they cut the DNA in different ways and in different places. The places in the DNA where the restriction enzymes cut are called “restriction sites”, which are short sequences of four to eight base pairs.
STEP 3: Use enzymes to recombine the DNA fragments
After cutting the DNA, you will then want to recombine the DNA fragments into a single piece of DNA using enzymes that allow you to join the fragments of DNA together. These enzymes, known as DNA ligases, work with the complementary DNA basepairs and the DNA overhangs. This step can vary depending on the enzymes and assembly method you use as each have their own unique process of recombination.
STEP 4: Insert the recombinant DNA into bacteria
The process of inserting the recombinant DNA into the bacteria is a known as Transformation. In synthetic biology, the bacteria are often referred to as the “host” or the “chassis” because the bacteria provides the framework into which your designed DNA is placed.
Nowadays, much of the cloning workflow can be automated using liquid handling robots. Automation enables you to run multiple experiments in parallel, and also allows you to speed up the Design-Build-Test cycle. In fact, some industrial and research facilities known as “biofoundries” specialize in high throughput automation of DNA design and assembly.
Common components of a genetic circuit (Synthetic Biology Open Language, or SBOL)
Every design for gene expression requires a promoter, a ribosome binding site, a gene of interest (a.k.a. coding DNA sequence, or CDS), and typically, a terminator. Shown below are each of these elements illustrated with the Synthetic Biology Open Language (SBOL), which provides a means for you to communicate your DNA designs with other iGEMers and scientists.

The promoter is a sequence of DNA that initiates transcription of DNA downstream of the promoter sequence. The ribosomal binding site is a sequence that is responsible for the recruitment of a ribosome during the initiation of protein translation. Arguably the most important part of your genetic circuit is the gene of interest, commonly referred to as the coding DNA sequence (CDS), which is the sequence that codes for the protein that your genetic device requires. Some genetic circuits require a terminator, which is a sequence that marks the end of a gene during transcription. These are the common components that you will see in almost any genetic circuit, and they are important to understand when constructing your own genetic circuit.
Designing your genetic circuit
There are many questions you should consider when designing your own genetic circuit, including:
What are my inputs/outputs?
What is causing your system to start, or what is inducing expression of your genetic circuit? What are you producing by putting that genetic circuit into an organism?Which genetic elements do I use?
When you are designing a genetic circuit with a certain goal or output, you need to know what genetic elements are required for you to reach that goal or output. For example, what promoter is required for the target level of expression for my gene of interest?What chassis should I use?
Most iGEM teams will use E. coli because it is a model organism that is very well understood and has robust engineering capabilities. But there are limits to E. coli that might cause you to consider other more complex organisms to engineer, such as cyanobacteria or yeast.What is my experimental design?
How do you design a genetic circuit that can be structured in lab and experimentally tested? Experimental design is a specific interest of the Measurement Committee because we want to make sure that everyone can communicate their results in standard units so your work can be built upon by other teams.How do I optimize my system?
Not only will you start to design and build your genetic circuit, you will realize there are steps where you have to take action to reduce challenges in your system and optimize the outputs. For example, maximum expression of your protein may not be the most efficient for your system so testing various levels of expression by using weaker promoters may help optimize the output of your genetic device.
The example shown below illustrates the process for designing a genetic device that will demethylate the chemical vanillate:
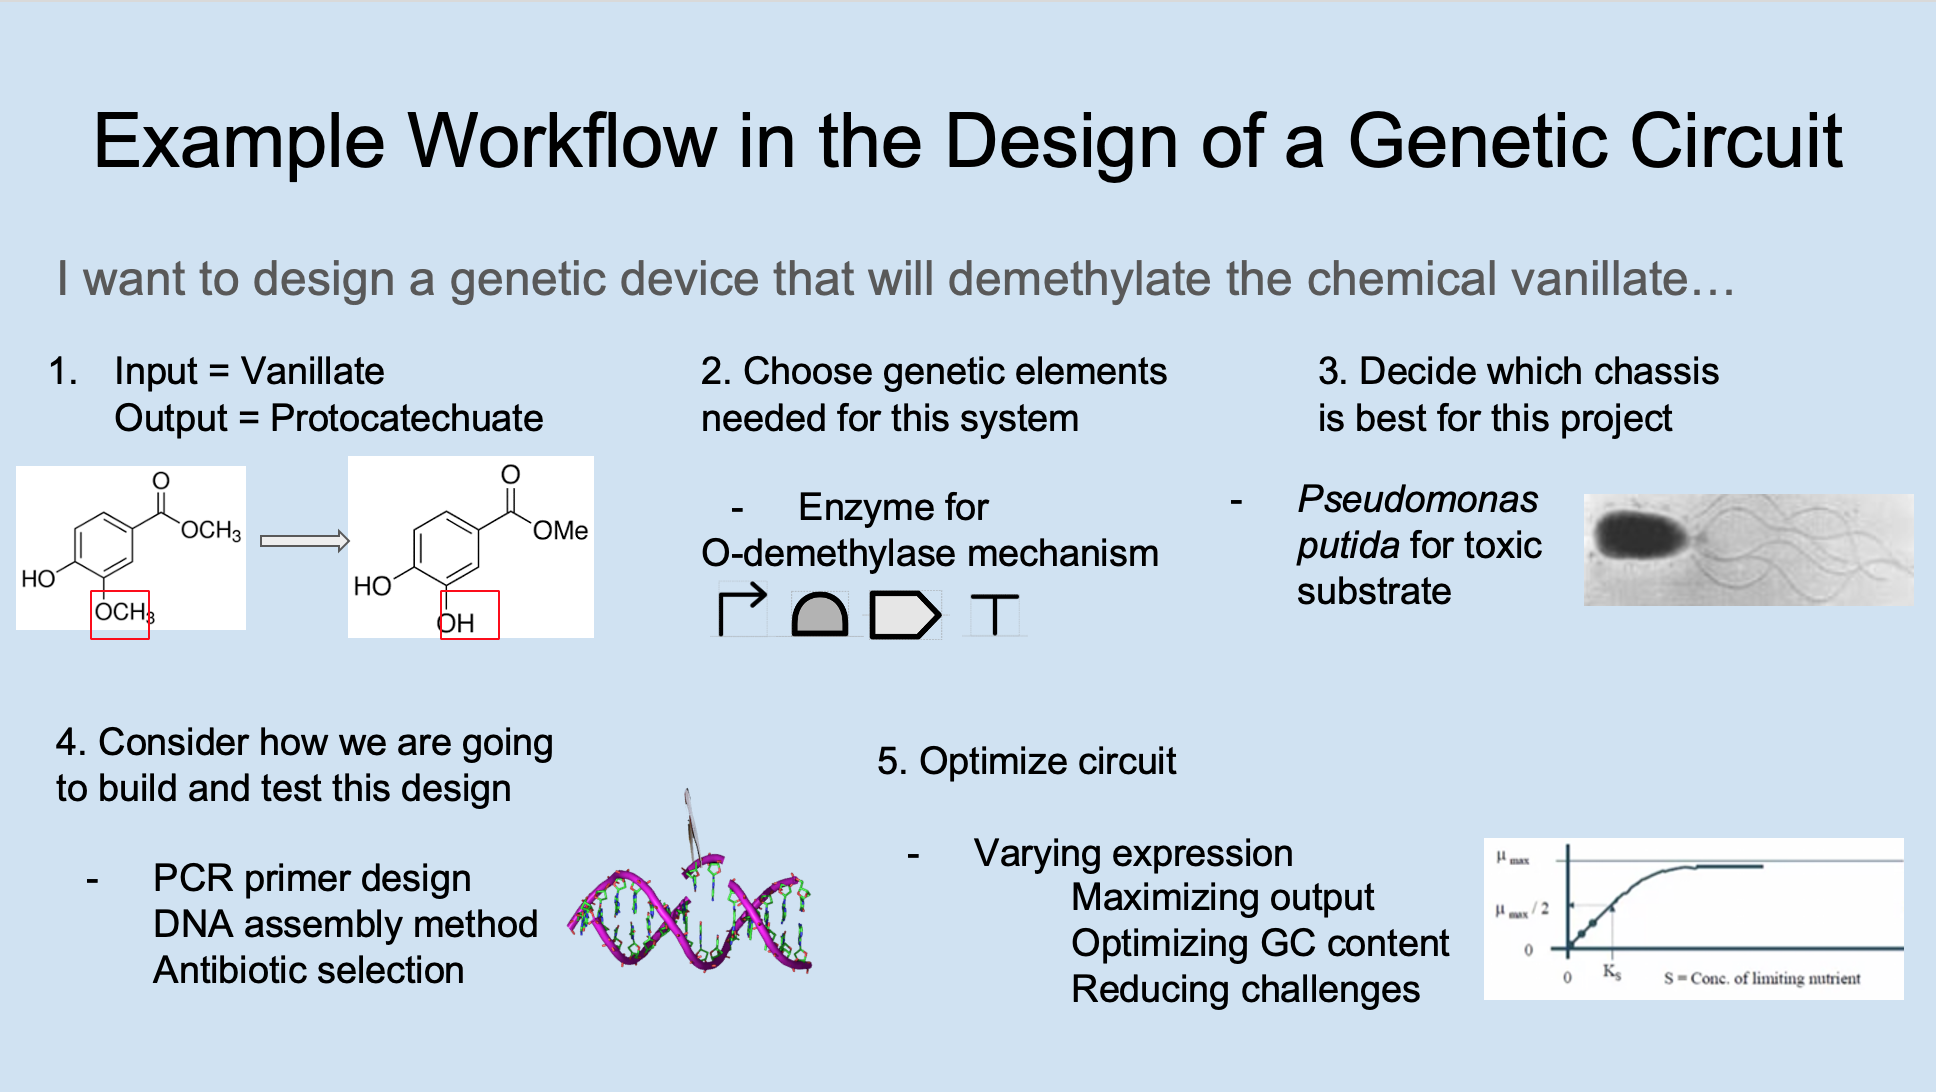
Step 1 shows the input is vanillate and the output is protocatechuate (which is demethylated vanillate).
Step 2 shows that the coding DNA sequence needed is an enzyme for O-demethylase that will turn the input of vanillate into the output of protocatechuate. Other components needed include a promoter, ribosome binding site, and terminator.
Step 3 shows that the soil bacterium Pseudomonas putida was selected as the chassis for this project because vanillate is a toxic substrate that is known to cause a metabolic burden for E. coli, and P. putida is more suited as a metabolically engineered organism.
Step 4 shows the considerations for how to build and test this design. For example, what PCR primer designs are needed? What DNA assembly method(s) will be used? What antibiotics are available for your team?
Step 5 shows various ways of optimizing the genetic circuit. Varying expression is one approach to consider since expressing genes will place a metabolic burden on the cell, and so you may want to use a promoter library and test different levels of expression. Maximizing output is another approach where you ask how much enzyme you are putting into the system to optimize the output of protocatechuate. Optimizing GC content is another approach where you consider the fact that some gene sequences have a higher GC content that could cause problems when engineering a genetic circuit. Reducing challenges is mostly an overview for optimizing a genetic circuit that considers all the other ways you can reduce the noise that is causing the genetic circuit to not perform optimally.
Building your genetic circuit
There are also many questions to consider when building your genetic circuit, including:
What methods are available for your team?
Every team should first consider the methods that are available for the team when beginning to build a genetic circuit.How will I troubleshoot?
Do you have a mentor or PI that will be available for you at all times? Oftentimes mentors and PIs have specific specialties that do not span all of synthetic biology. How will you overcome challenges in building your genetic device that your mentor or PI cannot help you with?How will I validate what I build?
It’s important that you are able to make sure that the genetic device you build is in fact the genetic device you intended to build. Validating your genetic device is important for earning medals in the iGEM competition and is accomplished through methods such as gels, antibiotic selection and sequencing.What tools and resources can I use?
What tools and resources are available for your team to use? (We’ll talk about what is available to you through iGEM later in this post)What reagents and protocols will I need?
It’s important to have your protocols defined before entering the lab and the reagents required readily available when you are entering the cloning and assembly phase.
Looking again at a genetic device that will demethylate the chemical vanillate, below is an example workflow:

In step 1 you will assemble the protocols and reagents needed for building your genetic circuit. There are several iGEM Sponsors that have special offers for iGEM teams to help you (discussed later in this post)
In step 2 you will purify or synthesize the DNA for your genetic device. Recall that you can either purify DNA from an organism you have in the lab (natural DNA) or order the DNA sequence you want from a DNA synthesis company (synthetic DNA).
In step 3 you will use restriction enzymes and PCR to obtain the desired gene fragments. The example shows two overlapping genes that are ready to be assembled.
In step 4 Gibson assembly is used to assemble the DNA fragments, giving you a plasmid with your assembled gene sequence.
In step 5 transformation is used to insert the plasmid encoding your genetic device into your chassis and antibiotic selection is used so that only those bacteria carrying the plasmid with your genetic device will grow. (Many engineered plasmids carry genes for antibiotic resistance and so only those bacteria with the plasmid containing your genetic device will grow in the presence of the antibiotic.)
In step 6 you will use DNA sequencing to verify that the bacteria is carrying the plasmid with your genetic device. There are many iGEM Sponsors such as SnapGene and IDT that can help you with DNA sequencing.
Learning about PCR
The polymerase chain reaction (PCR) is a fundamental method that allows a single region of DNA to be copied multiple times. The basic components in a PCR reaction (shown in the illustration below) include the template DNA that you want to make multiple copies of (in blue), DNA primers that you have designed on your computer and ordered from a DNA synthesis company (in green), and free nucleotides and enzymes that are needed in the elongation phase.

PCR begins with a denaturation phase where you heat up the template DNA, causing the two strands of DNA open up away from each other. In the annealing phase, the DNA primers you have designed are able to bind to the template DNA. And in the elongation phase, the enzymes and free nucleotides elongate the DNA from the primers to create a whole new copy of the template DNA. By repeating the PCR cycle 30 times or so, you can create an exponential number of copies of your desired gene fragment that will be ready for assembly.
Tip!
How your DNA primers are designed will determine the PCR product and assembly. You will need someone with experience to help you with PCR primer design. If you don’t have someone in the lab who can help you, be sure to reach out to the Measurement Committee. We are here to help you with designing your primers.
Overview of Assembly Methods

BioBrick assembly (RFC 10) uses restriction sites that flank every gene segment, allowing “parts” to be interchanged, but introduces scar sequences.
Gibson assembly uses exonucleases that create large overhangs for annealing fragments, allowing for more accurate assemblies.
Golden Gate assembly (Type IIS assembly) uses an endonuclease that creates fragment-specific overhangs, allowing 20+ fragments to be assembled at once in a relatively short time.
Cloning & Assembly Troubleshooting
Troubleshooting is one of the most important aspects of cloning and assembly. The Measurement Committee recommends that you validate your cloning and assembly steps with checkpoints, including:
Gels enable you to show that the plasmid you have designed and assembled is the correct size
Colony PCR is another checkpoint you can use to show that the plasmid you have designed and assembled is the correct size inside the chassis that you have used.
Antibiotic selection is a checkpoint that allows you to show that only the bacteria carrying the plasmid you have designed and assembled (with the antibiotic resistance gene included) are able to survive in the presence of the antibiotic.
Sequencing is the final checkpoint to show that the plasmid you have designed and assembled does not contain any mutations in the promoter or gene of interest that might affect the performance of your genetic circuit when you move on to the testing phase.
Checkpoints are a crucial part of the engineering process where you gather experimental evidence to show that you have built something in the way that you intended to build it. Before you worry about convincing the Judges that your genetic device is built in the way you intended and that it works, you must first convince yourself and your fellow iGEM team members.
It is important to include effective positive controls, negative controls, and standards in your experiments. Positive controls enable you to show that the experimental conditions are working when you test your genetic circuit. Negative controls enable you to show that the experimental conditions no longer work if you leave out a required component. Standards serve as a reference point for interpreting your data (for example, the size of a molecule run on a gel).
Tip!
You must not only prove that your genetic circuit was built as intended, you must also be able to convince others (including the iGEM Judges) that your genetic circuit was built as intended. Take time and care in preparing the graphs, gel images, tables, etc. to show your data, and use clear labeling so that others will understand your data.
Cloning & Assembly Resources
Use your mentors! PIs, advisors, graduate students, and many others with experience in cloning and assembly can be helpful to you in thinking through your experimental designs and trouble-shooting.
The iGEM Measurement Committee is here to help you. Check out the iGEM Measurement Hub for resources and protocols, and join members of the Measurement Committee for informative webinars and office hours. You can also ask a question to the Measurement Committee that will be answered on the Measurement Hub FAQ page.
Take advantage of the many databases with massive amounts of information on protein and gene sequences that can be helpful to you. Examples include EcoCyc, UniProt, and NCBI (this is not an exhaustive list). Watch the webinar “How to Use Biological Databases and Tools for Beginners” (YouTube)(Bilibili) to understand what tools are available at your disposal and learn how to use databases effectively. In particular, take a look at the iGEM Registry of Standard Biological Parts, that has been built by past iGEM teams for you to use. At the end of the season, your team will help continue to build and improve the iGEM Registry by contributing the parts you have made, improved, or characterized this year.
Finally, check out the special offers available from iGEM Sponsors that can help you obtain lab resources, software, protocols, and more for your iGEM project.
In closing, we hope you find this information helpful. Of course, there is far more to be learned about cloning and assembly than we can present in a single blog post, but the many resources that are available to you as an iGEMer will help you learn and become successful in designing, building and testing your genetic circuits. We wish you an exceptional iGEM experience in this exceptional year!